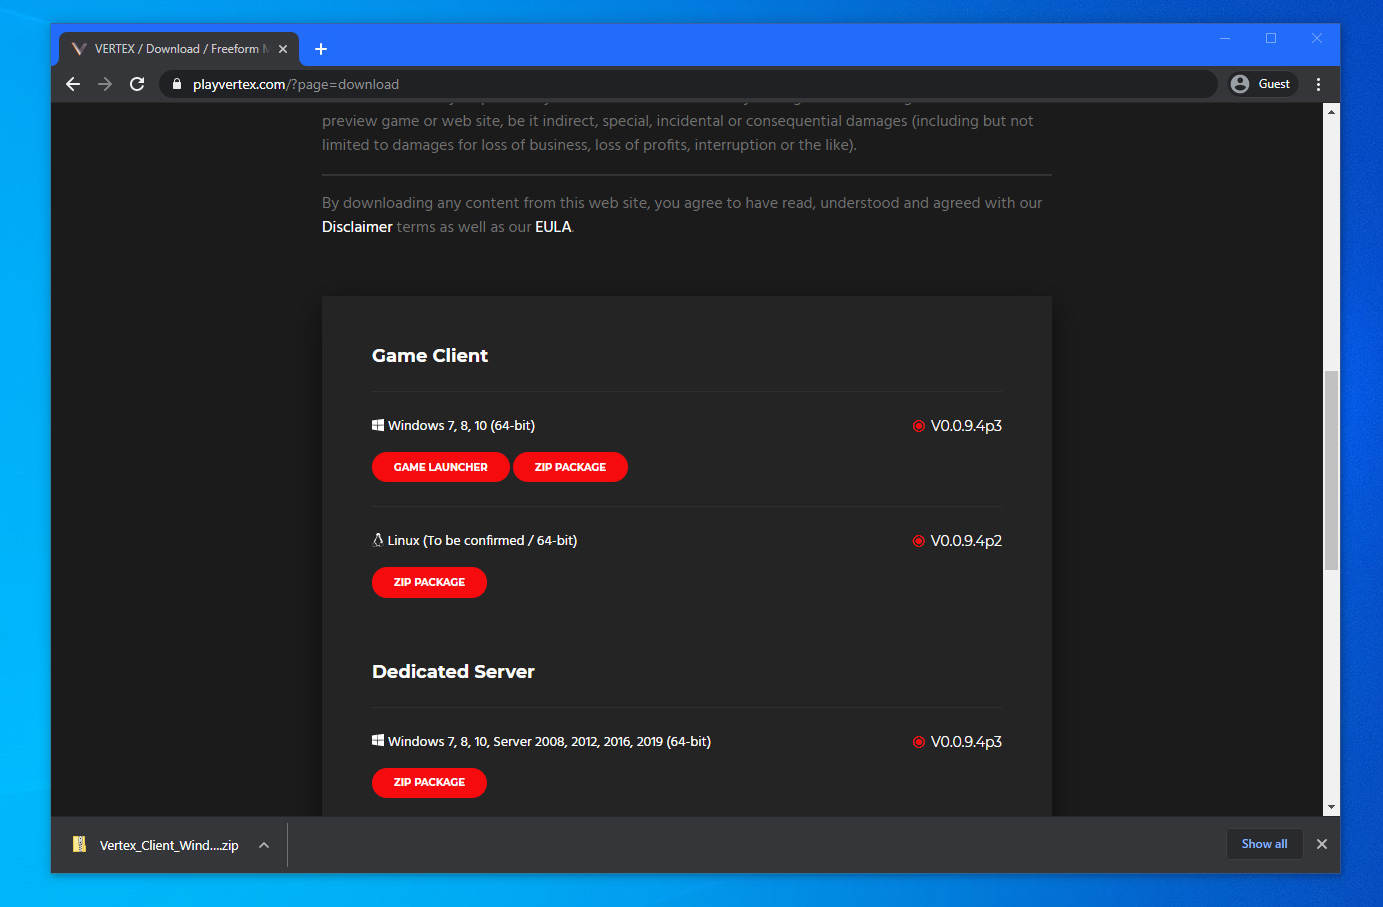
1) Download the latest installer directly from our Download page under "Game Launcher".
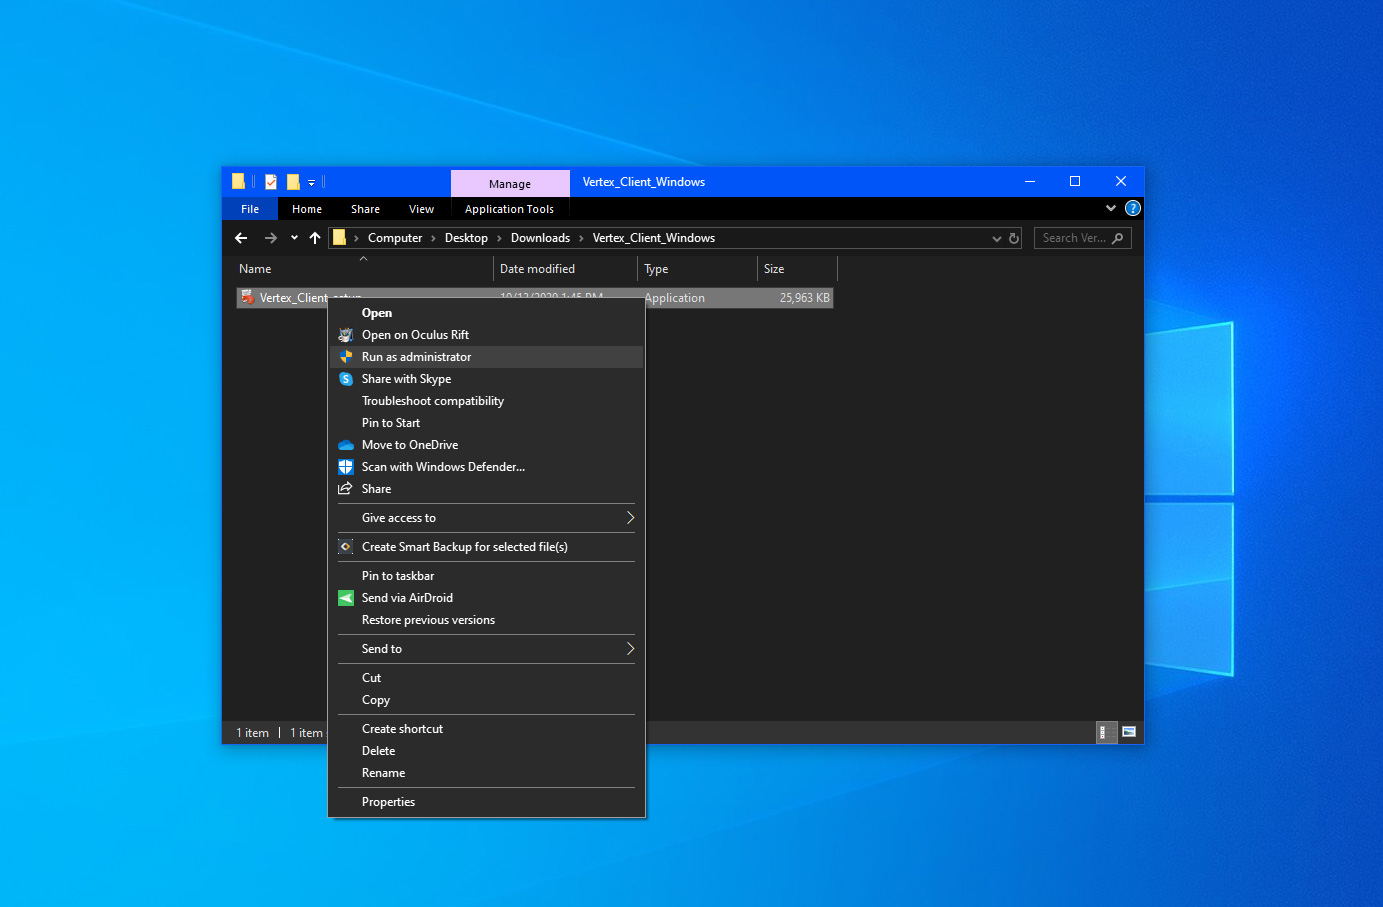
2) Once downloaded, right-click on the "Vertex_Client_Windows.zip" file and select "Extract all..." to unzip it's content.

3) Then navigate inside the new extracyed folder and right-click on the "Vertex_Client_setup.exe" file and select "Run as administrator" to begin the installation process.
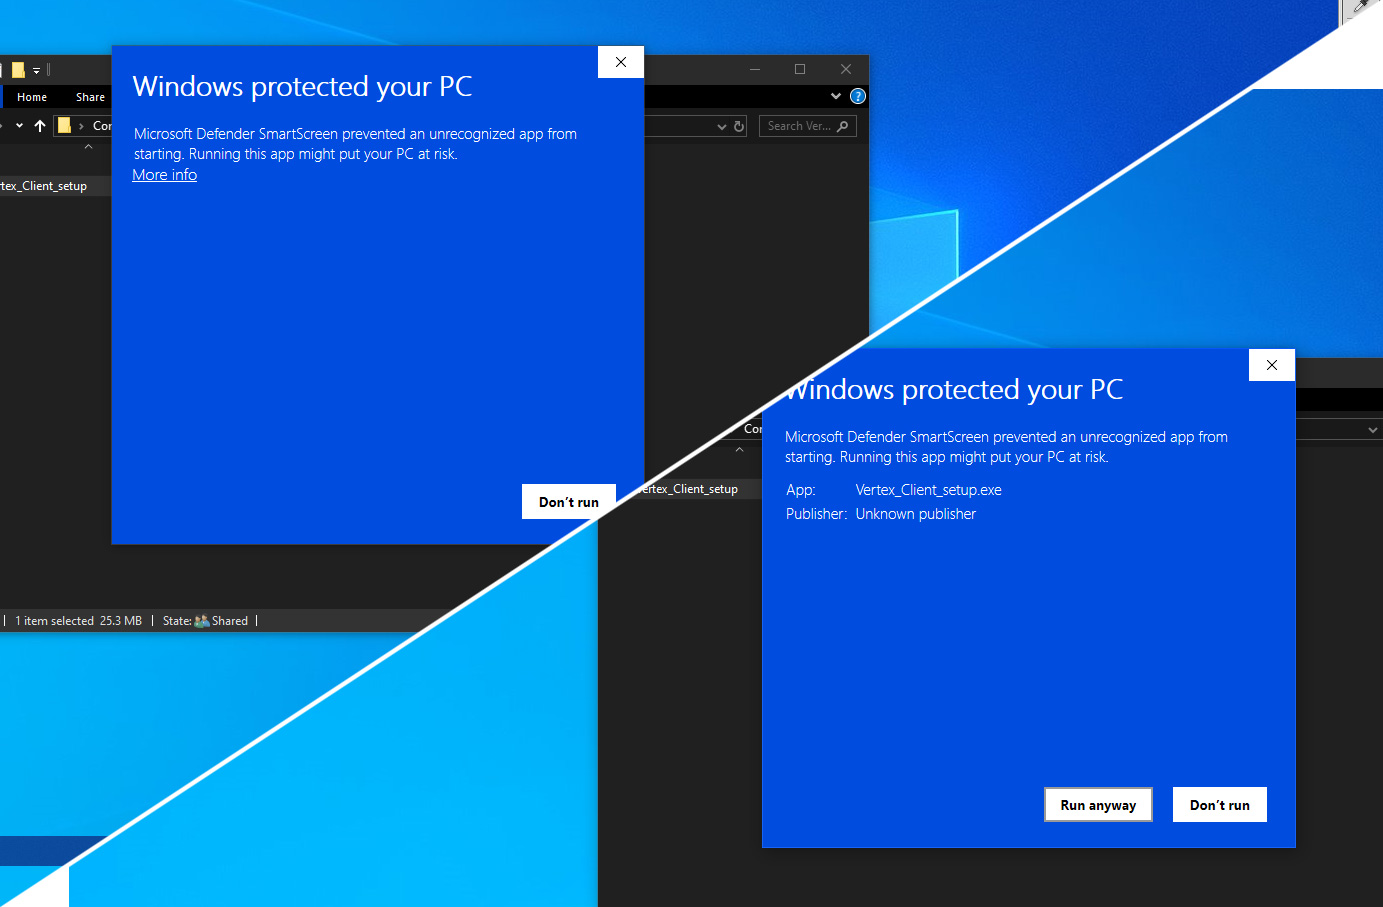
4) Your computer may restrict running installers from unknown publishers. If that happens, simply click on "More info" and then "Run anyway" to continue the process.
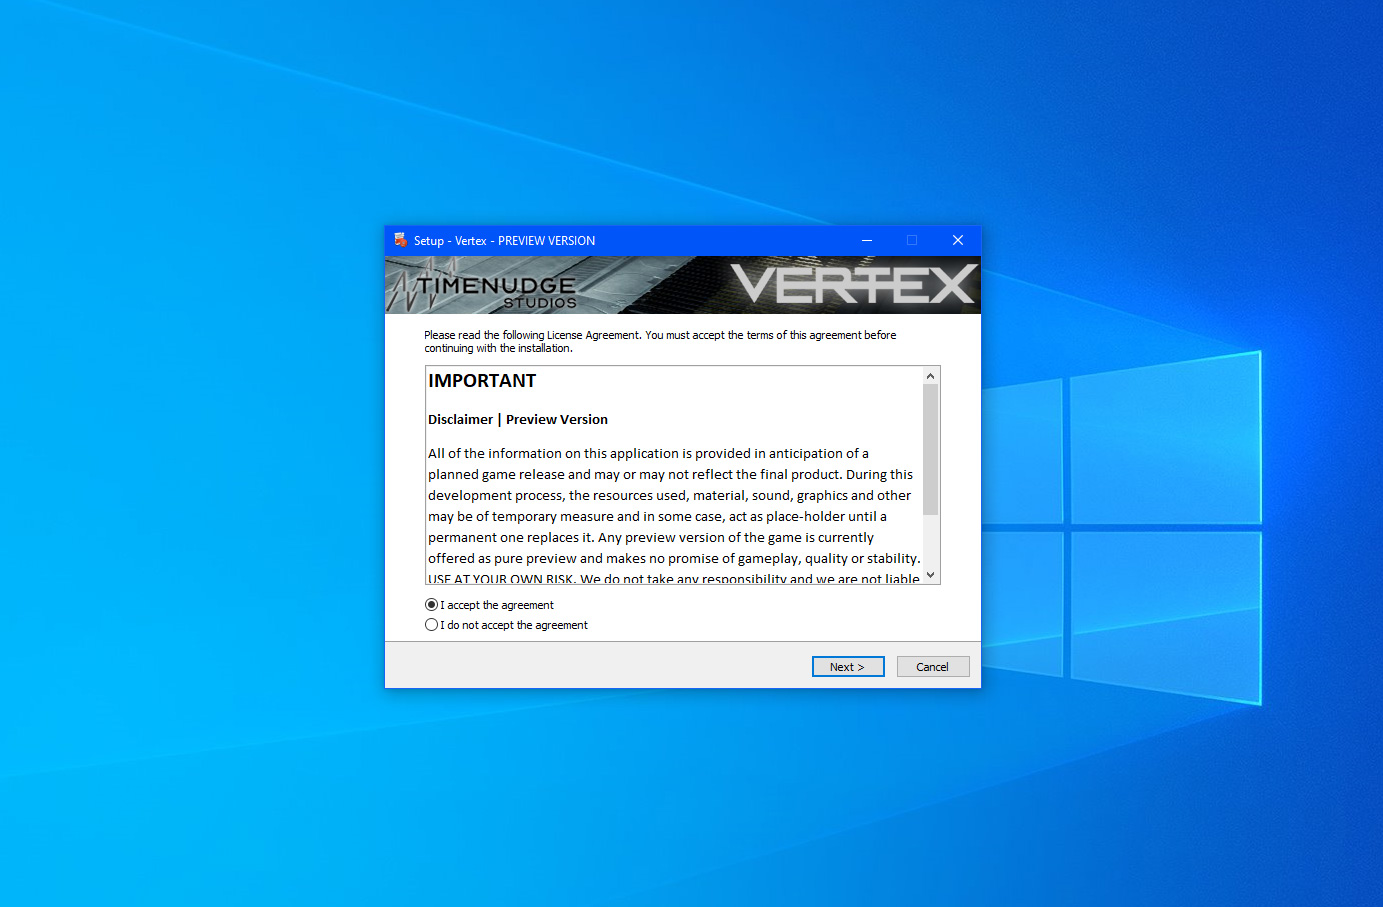
5) Follow the on-screen setup steps to complete the game's installation.
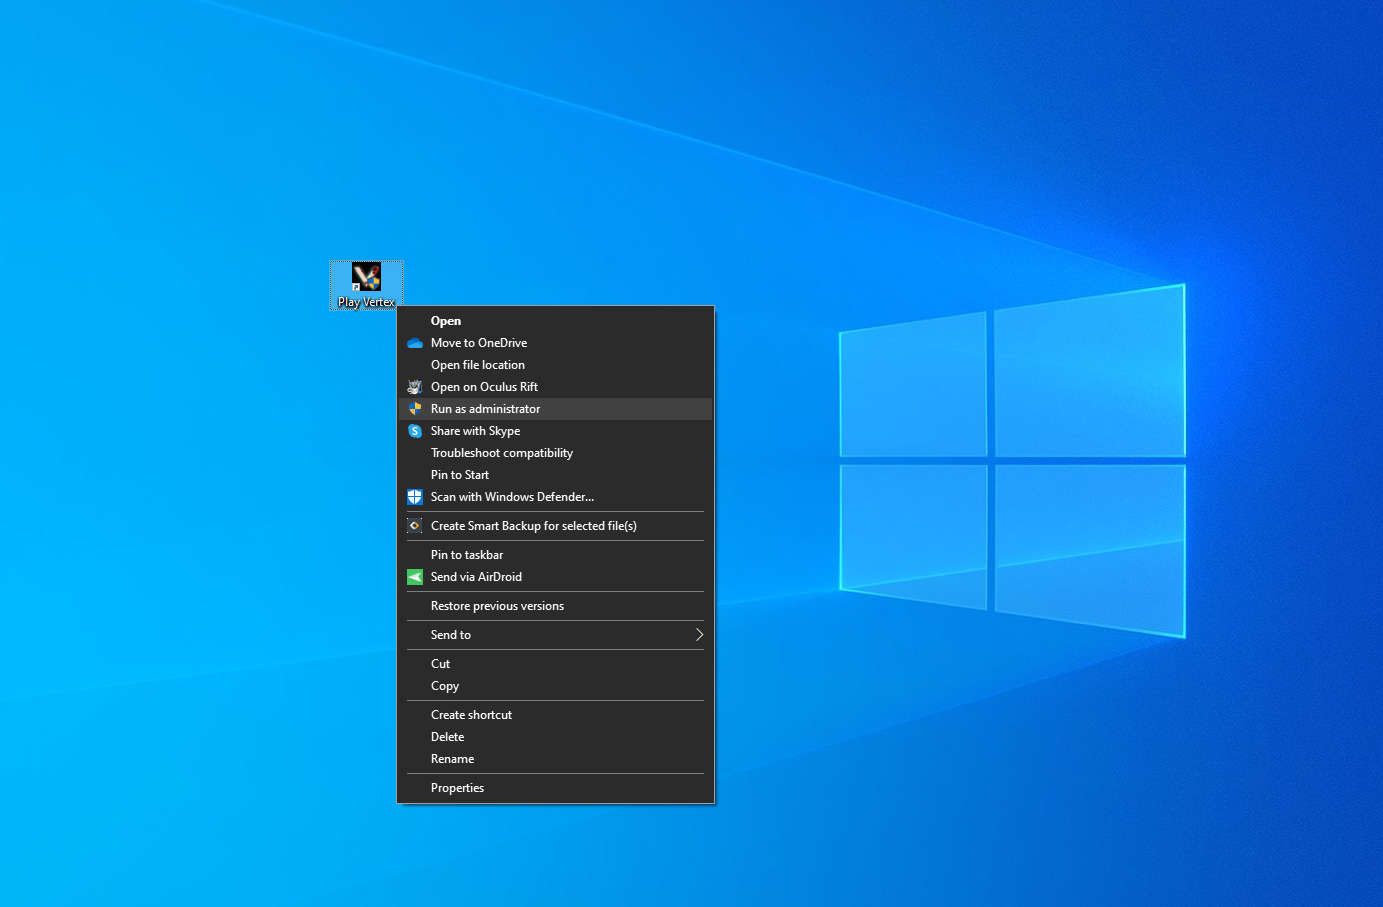
6) You should now have a Desktop shortcut called "Play Vertex". Simply right-click on the shortcut and select "Run as administrator" to start the Launcher.
7) The Launcher should now download and sync your game files. Depending on your internet and disk speed, this may take some time. Once completed, the "PLAY" button should become available.
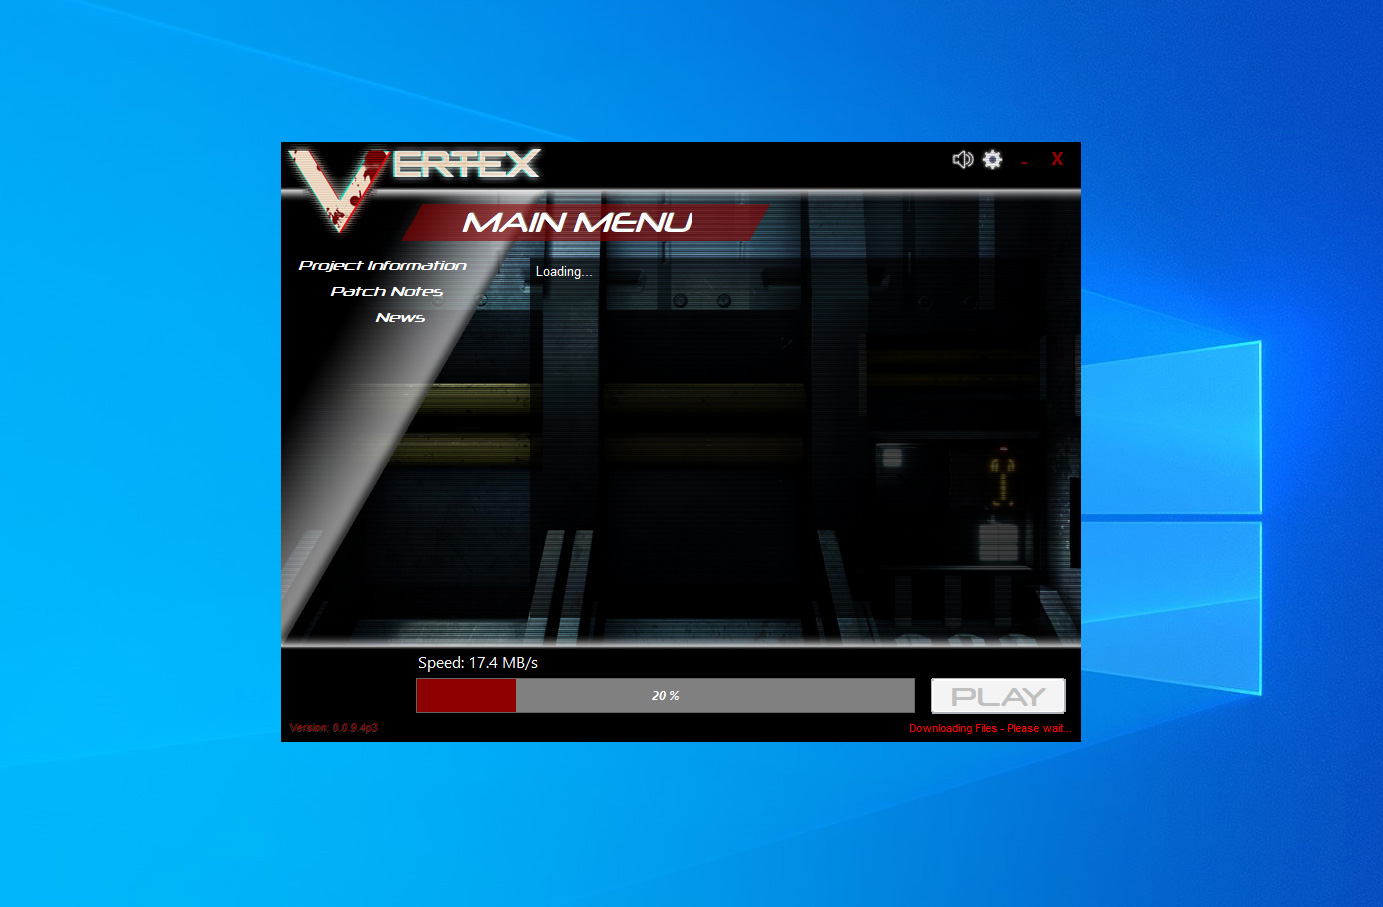
8) You should now be good to play and enjoy the game!
- If you run into any Download issues, you can always try the ZIP PACKAGE.
- If the game downloaded without issues, but won't Start, I would invite you to visit our Troubleshooting section for further support.
Mods can be found on mod.io.
1) First, you'll need to download the wanted mod using the "Manual download" cloud-looking button.

2) Once downloaded, double-click on the downloaded file to view the archive's content. Inside, should be a "
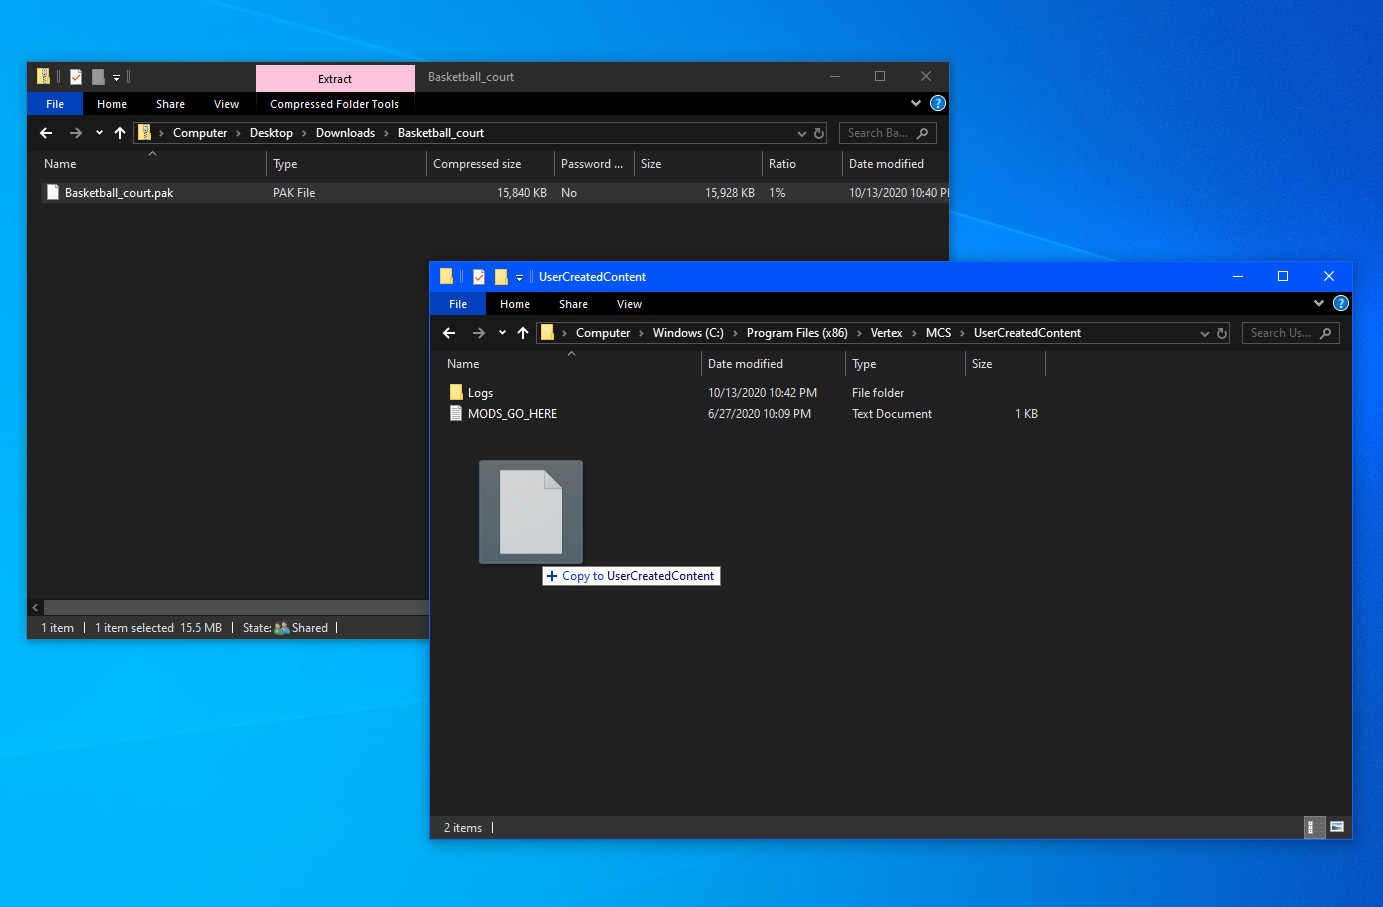
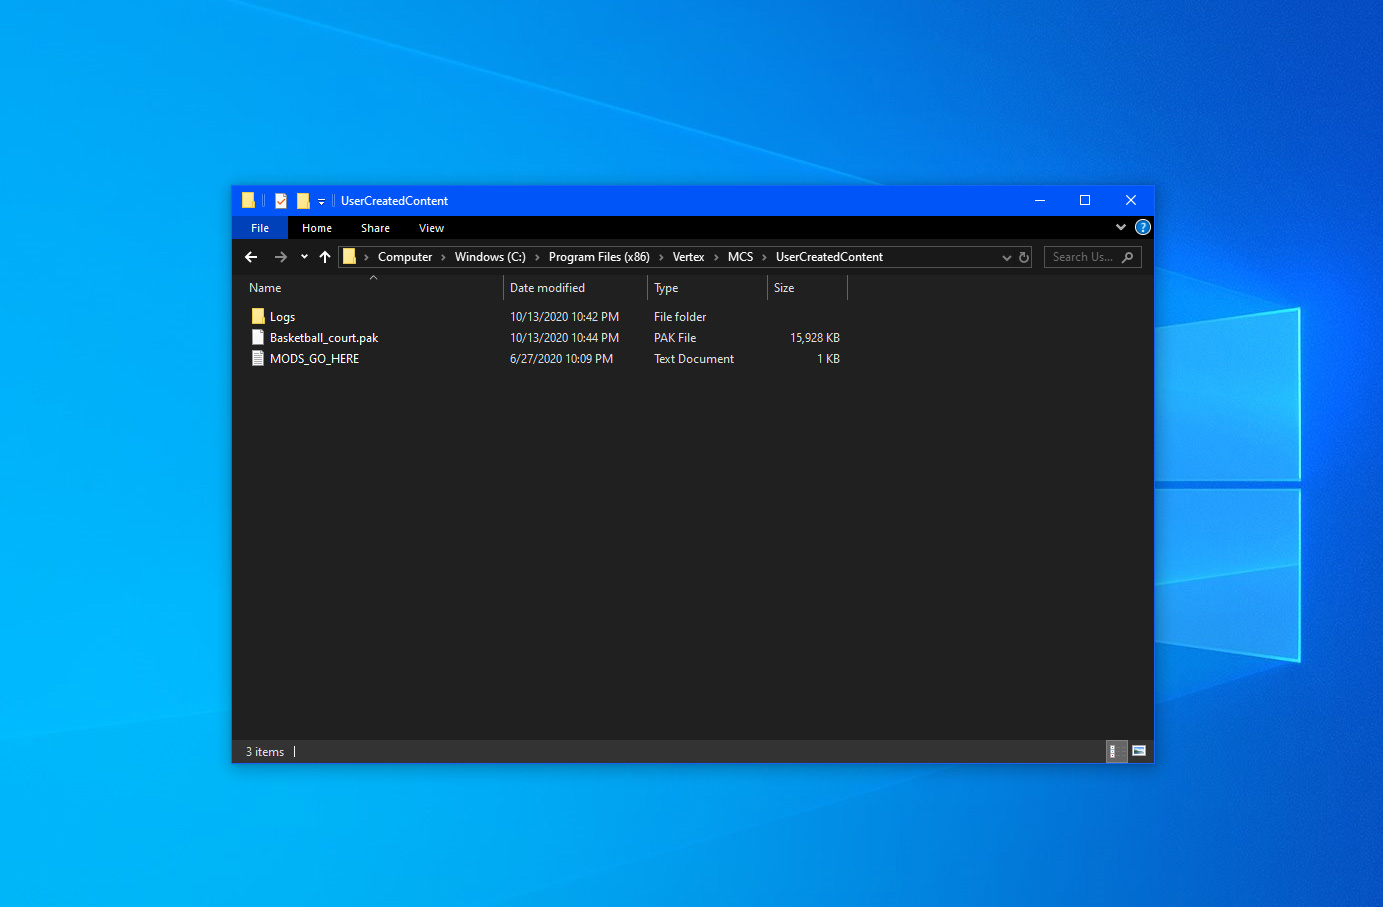
3) Your UserCreatedContent folder should now have a new .pak file corresponding to your wanted mod. You are now ready to go in-game and try it out!
- Please remember that the server also needs to have the same mods as you in order for you to be able to use them. ZIP PACKAGE.
- If you are hosting your own server, please make sure to also place any mods into your equivalent Dedicated Server's UserCreatedContent folder as well.
- For any support concerning a specific mod, please contact the mod's author.
1) Download the latest server ZIP package directly from our Download page under "Dedicated Server".
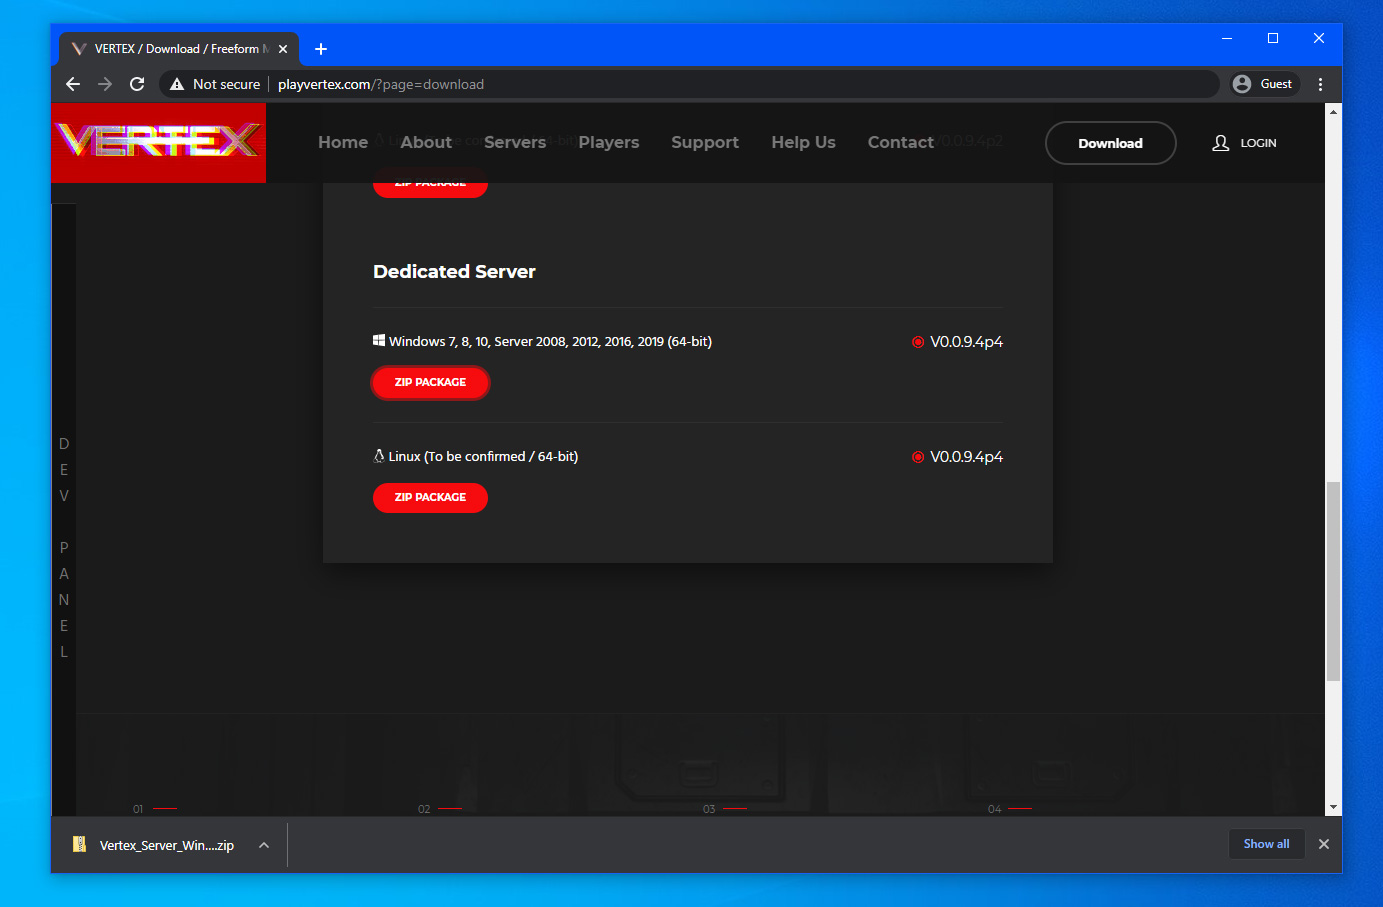
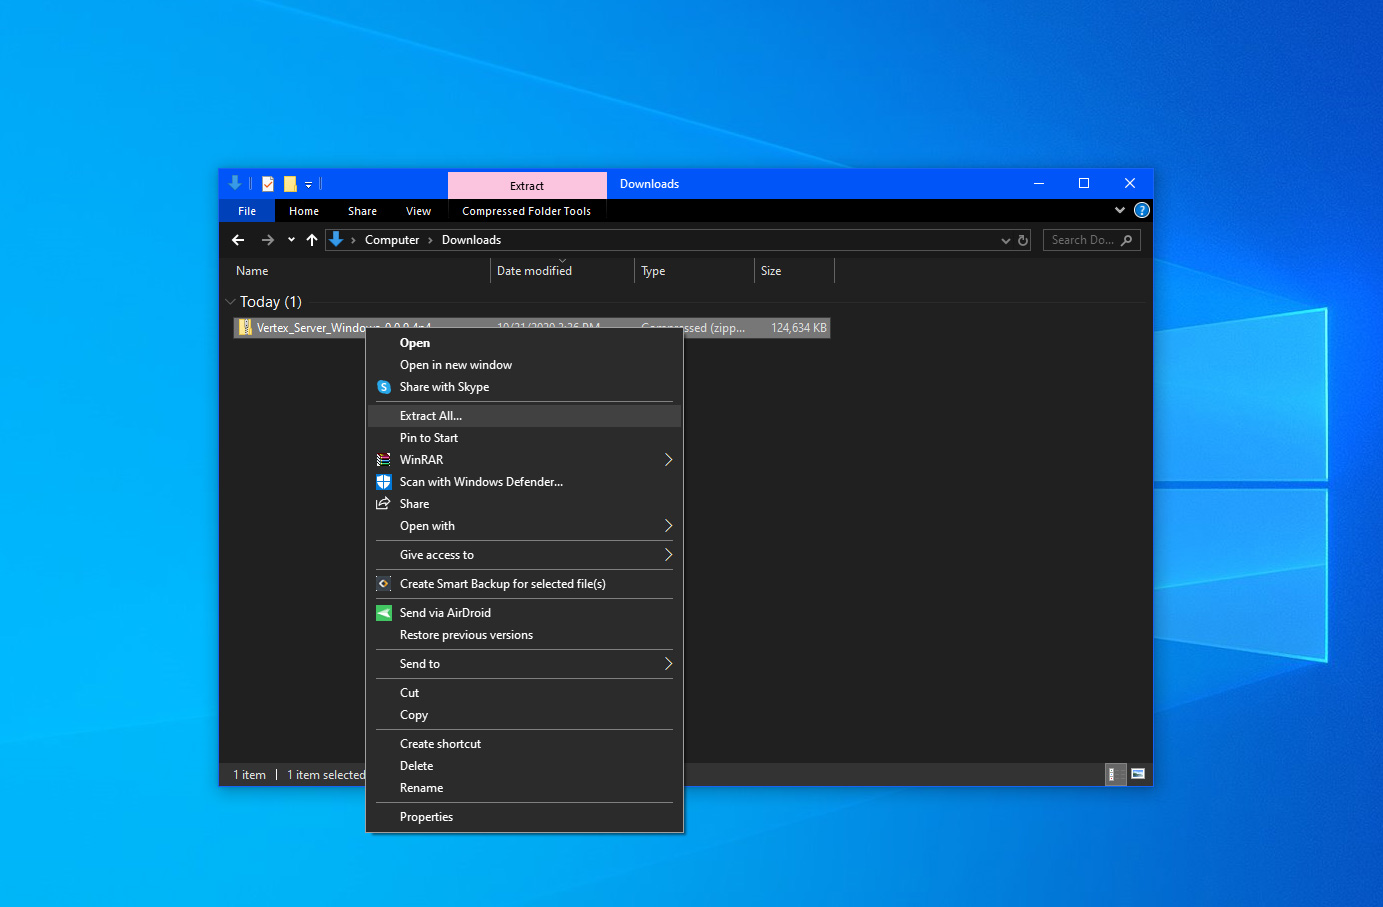
2) Once downloaded, right-click on the "Vertex_Server_Windows_x.x.x.x.zip" file and select "Extract all..." to unzip it's content.
You can then place the "Server" folder to the location of your choice. If unsure, feel free to place it inside the root directory of your Vertex game installation.
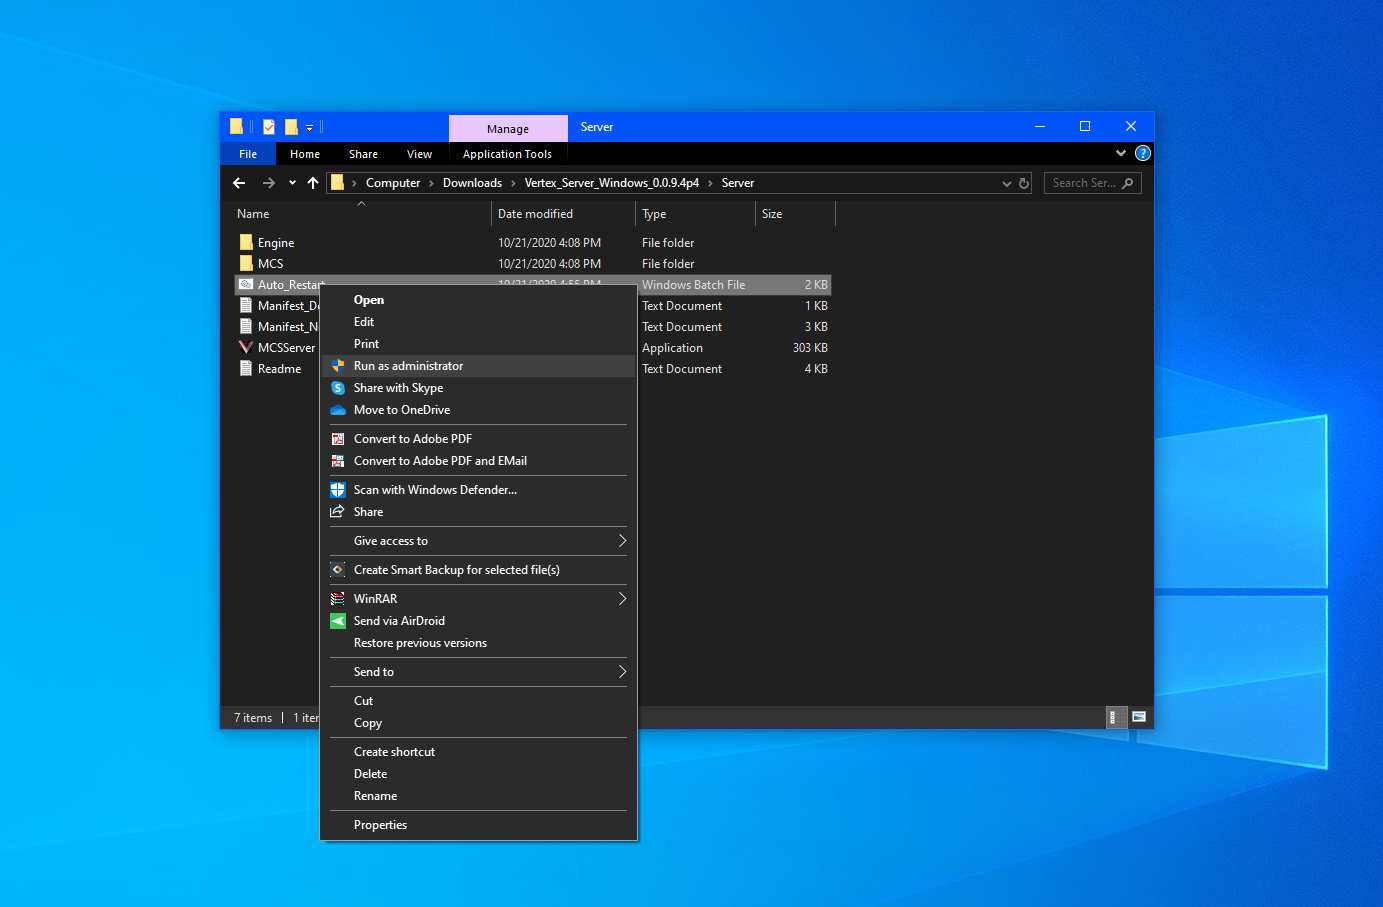
3) Then navigate inside the new extracyed folder and right-click on the "Auto_Restart.bat" file and select "Edit" in order to make changes to the server configuration, such as the map, gamemode, port (if needed) and server name.
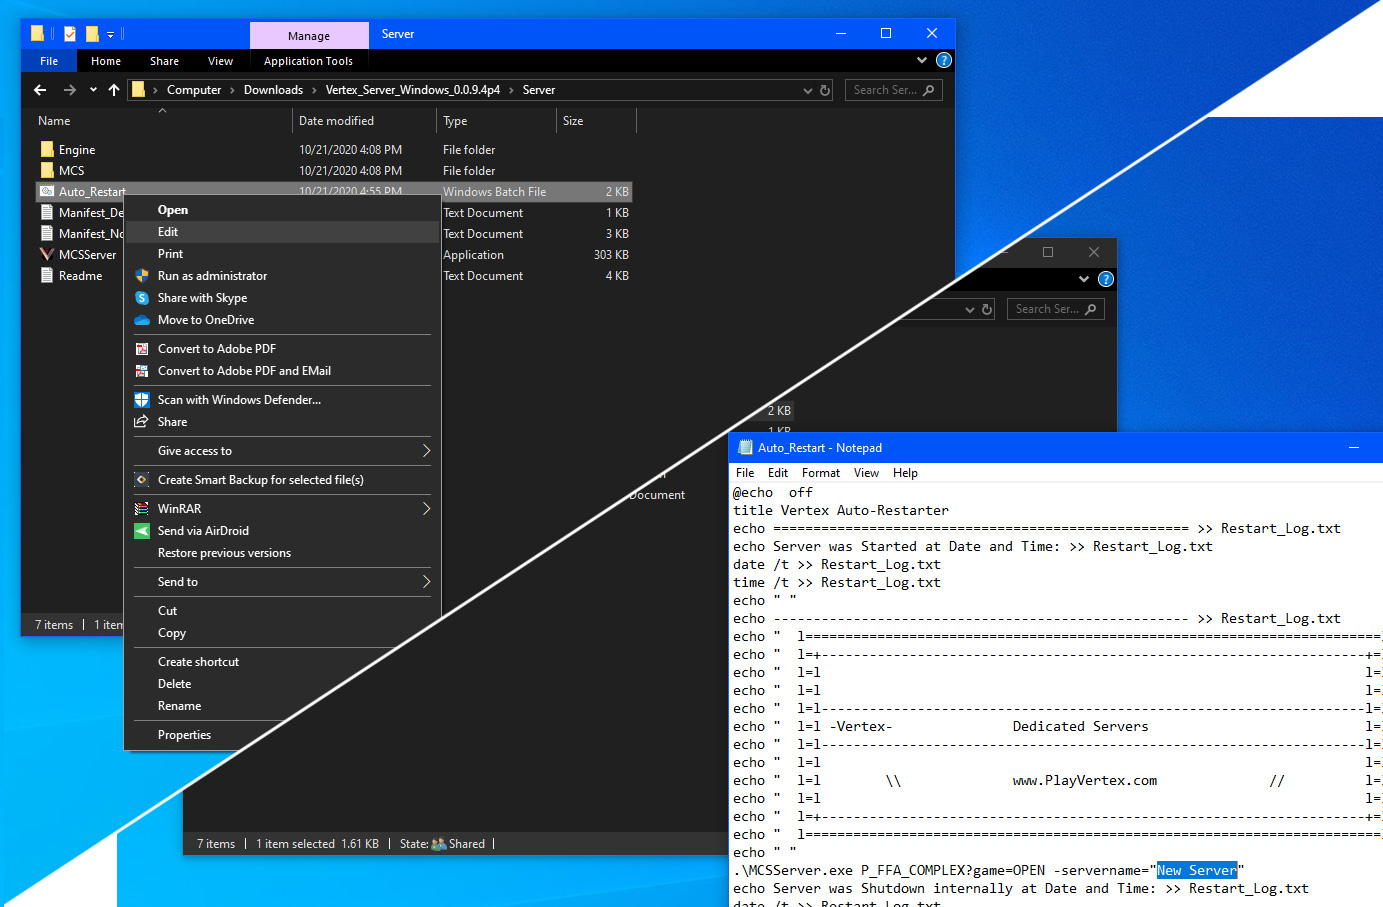
4) Once ready, simply double-click on the "Auto_Restart.bat" file (in some cases, you may need to right-click and select "Run as administrator") to start the server.
5) A command prompt window should now appear. Please do not close this Window, as it is what allows your server to auto-restart on fail/crash.
Loading may take some time, especially on first try or slower machines. Eventually, a second window should show up: this is the server's console.
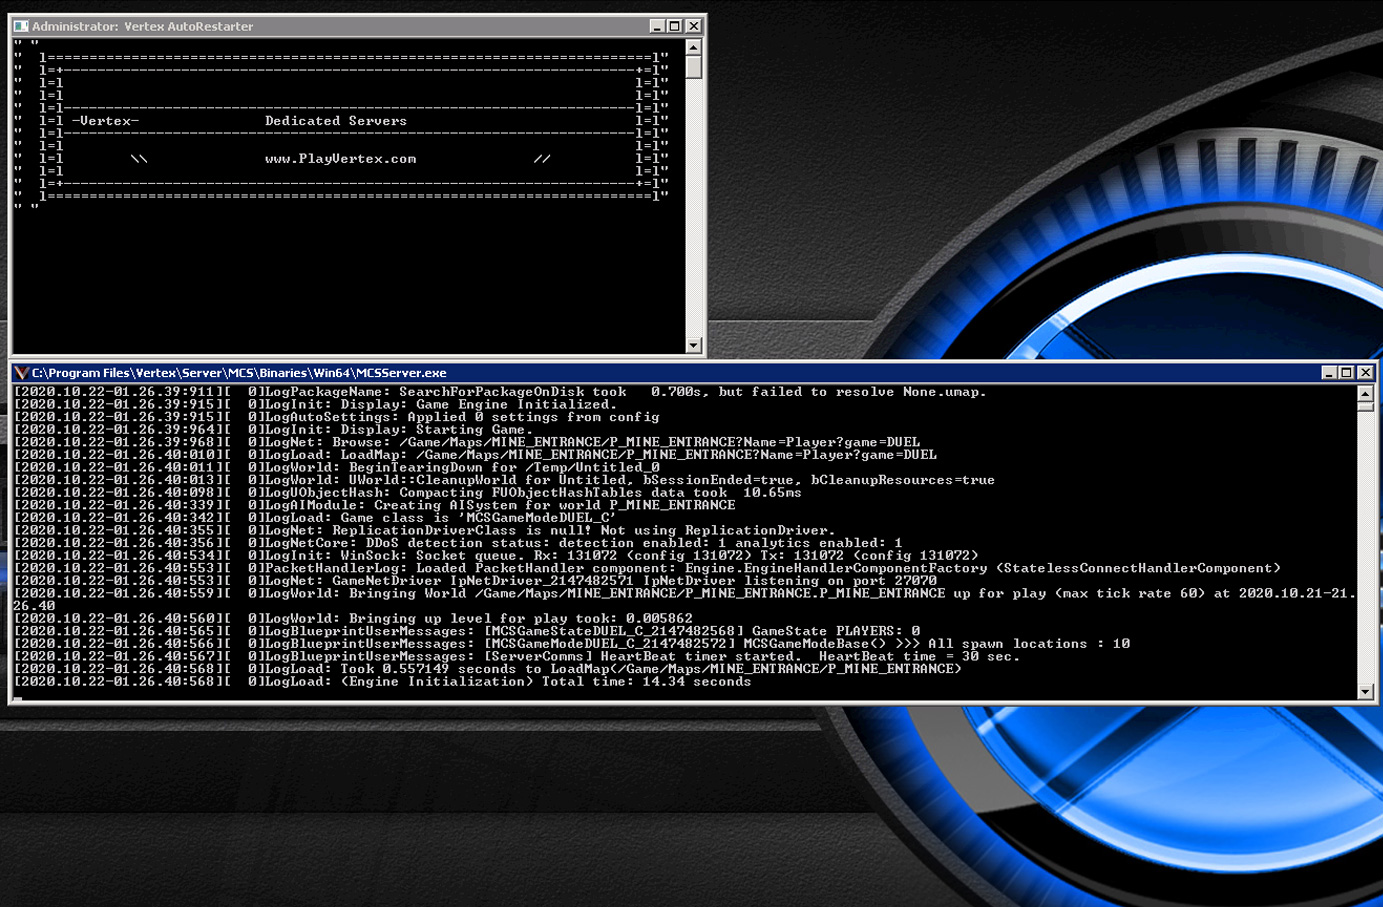
- Please note that at this time, the console is view-only and cannot be typed into or interacted with. Any administrative operation must be done in-game using the "Administration" option.
- Consult the "Readme.txt" file located in your Server folder to view more advanced configurations and customization options.
- In order to allow players to join your server over the internet, please make sure to configure your router to port forward your game port (default: 27070) to your server's local machine IP.
- For any support, we invite you to visit our official Discord server or to create a Support ticket.
This guide will take you through the steps of setting up the Vertex SDK (Software Development Kit) to create your own modifications. These steps are mandatory for all kinds of mods, including custom levels, characters and weapons.
1) Download and install Unreal Engine 4.26.
2) Download the latest Vertex SDK (available on our Download section) and extract the content ofthe .zip file to a folder of your choice.
3) Go into the folder and open VERTEX_MODS.uproject. If you get asked for the version of the UnrealEngine you want to use, select 4.26.
Grab a coffee. Opening the project for the first time can take a couple of minutes.
Once the project has opened, you should see a Content folder with two sub-folders in it: MCS and GoodSky. These folders include assets that you can use for your own mods.
New mods are created as "Plugins" within Unreal Engine. Our next step is to create said Plugin.
4) Go to Edit -> Plugins -> New Plugin.
5) Select "Content Only", then give the plugin a name (the name of your mod), for example"MyFirstMod".
You should now have a new Content folder in your Content Browser with the name of your Plugin (for example "MyFirstMod Content"). This Content Folder is where all the assets for your mod are stored. Don't confuse it with the base "Content" folder that already existed before you created the plugin. You shouldn't add anything to that base content folder because whatever you add to that folder won't be packaged correctly in your mod. However, you can drag and drop anything from the base content folder to the plugin's content folder to use and modify it for your mod.
Now we ne need to make a new custom build profile for building mods.
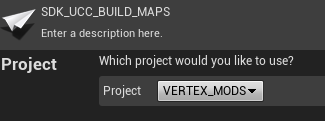
6) Go to Windows -> Project Launcher. Click on the button with a "+" symbol in the bottom right tocreate a new profile.
7) Now click on "Edit Profile" (wrench-symbol).
8) Make sure your current project (VERTEX_MODS) is used. If it's not set, then do so by navigating tothe project's folder and selecting the VERTEX_MODS.uproject file.
Now to the settings of the build profile.
9) "Build" needs to be un-checked.
10) On The "Cook" section, everything needs to be unchecked except for "WindowsNoEditor".
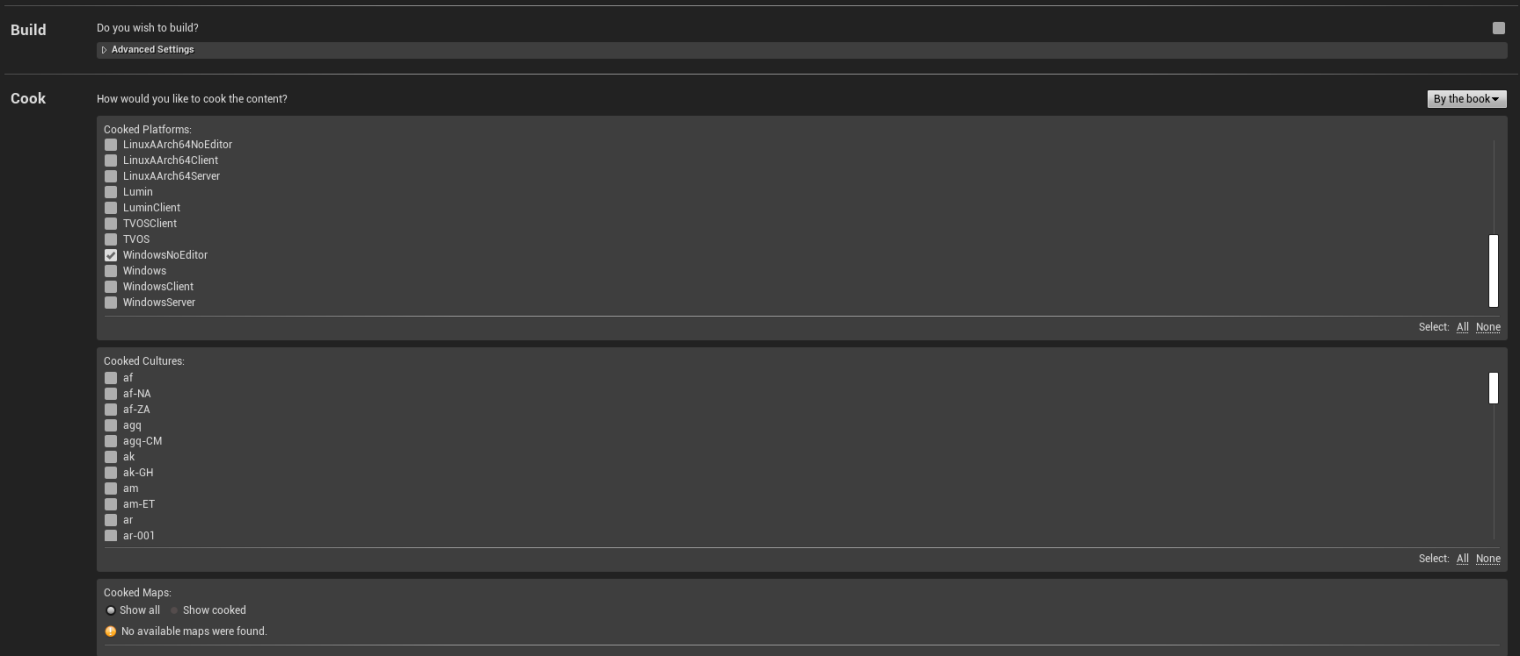
11) Open the "Release / DLC / Patching Settings" section and at "Name of the DLC to build" enter the name of your plugin.
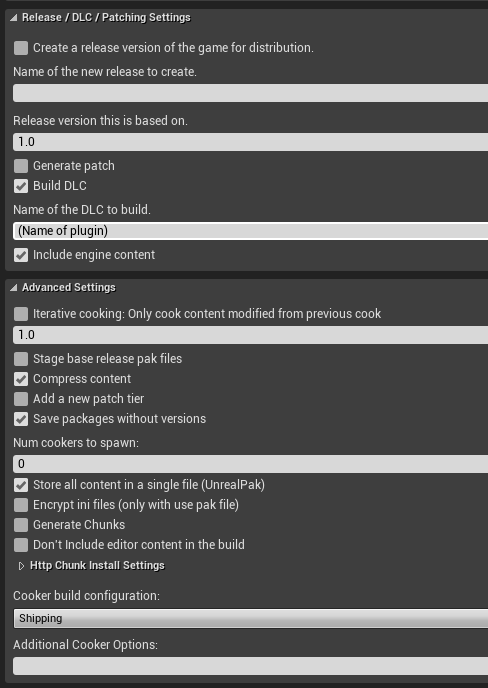
Make sure to copy the settings above to ensure a successful build.
You don't need to make a new build profile for every mod you make. You just need to edit the name of the plugin in the build profile at "Name of the DLC to build".
12) Leave everything else disabled.

You can, if you want, set "Package" to "Package and store Locally" and enter a new output path for your built mod.
13) Close this window for now.
This concludes the setup in the SDK for building mods. Now let's assume you already created a mod and want to build it.
14) Every file that is not saved will not be included in your built mod. So go to File -> Save All.
15) Now open Windows -> Project Launcher again and launch your new profile that you created earlier.
16) It is normal to get a lot of warnings when building your mods. However, if you get errors you most likely made a mistake in the setup.
In Windows explorer, open up your <project>Plugins/MyFirstMod/Saved folder. Use the Windows search to find the .pak file that you just built. The editor puts out very long names for your .pak files but you can rename them to whatever you want.
17) Put that .pak file in both the client and server "UserCreatedContent" folder.
18) Launch the server, then launch the client and direct connect to the server using the IP "127.0.0.1".
19) Success, you should see your own mod in the game now!
20) Before you build your mod again, make sure that you delete your whole Saved folder in your plugin folder.
21) To make your mods available to the public, upload them on vertex.mod.io. You need to pack the .pak file and all other files that are part of the mod (for example sound files) into a .zip archive, which you then can upload to mod.io.
This guide will teach you the basics on how to create custom maps for Vertex. You should read the guide for the basic SDK setup first, if you haven't already. It's assumed that you already created a new plugin.
1) Open the Unreal Project and go to File -> New Level and select the "Default" template.
2) Then go to File -> Save Current As, select your PLUGIN content folder (you can also create a new subfolder within the plugin's content folder) and save the map, for example as "MyFirstMap".
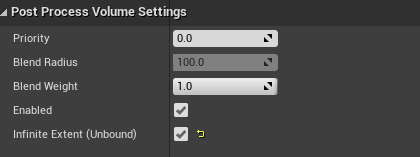
3) On the left side of the screen you can find the "PostProcessVolume" (in the Volumes tab or use the "search classes" textfield). Drag and drop the PostProcessVolume it into your scene. Change the settings in "Post Process Volume Settings". This allows the effects of your post process volume to be global for the whole level.
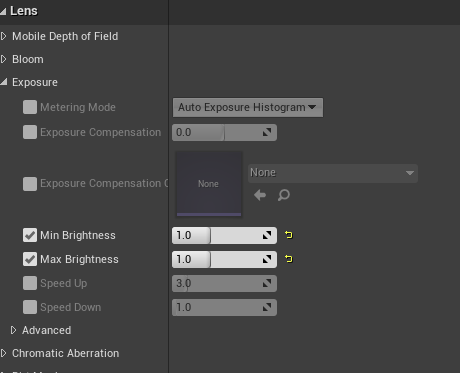
Change the settings in the "Lens" tab. This is not mandatory but recommended.
4) Find the "VertexPlayerStart" in MCS/SDK/MapModding. That's your spawn point. You can have as many VertexPlayerStart objects in your level as you want.
Don't use the default PlayerStart object! Those don't work in Vertex.
Go to the "Actor" section of the "VertexPlayerStart" object and then to "Tags".
There are four possible tags for "VertexPlayerStart" objects: "DuelOne", "DuelTwo", "TeamOne", "TeamTwo". Change the tag from "None" to "DuelOne".
Also change the "Spawn Collision Handling Method" to "Try to adjust location, but always spawn".
5) Now add a "Blocking Volume" from the left side of the editor (in the Volumes tab or use the "search classes" textfield), this will be a kill-trigger which will kill the player when he touches it. This is useful for pits, water, lava and other areas that are supposed to kill the player. Place it in the world and then scale it appropriately.
Go into the "Collision" settings and change the "Collision Presets" to "OverlapAll". In the Actor tab set it to "Always spawn, ignore collisions" and change the actor-tag to "KillVolume".
6) To be able to select the new map in the game, we need to make a datatable. Next to your map in the plugins content folder do a right click and choose Miscellaneous -> Data Table.
Then select the "LevelINFO" structure from the drop down menu that appears. Rename the Data Table to "DT_UCC_LEVEL_INFO".
7) Open the data table and add a new row. Change the name of the row to the name of your internal level name.
- LevelNameInternal is the UE4 asset name of your level, in this case it is: MyFirstMap.
- LevelDisplayName is the UI name that you see ingame.
- PrimaryID is NOT set.
- LevelType is set to "USER CREATED CONTENT".
- IsPlayable at the bottom needs to be checked.
- To display levelshots you simply need to drag and drop the images into the plugins content folder. Then you can add them to the datatable. Large should be 1920x1080 and small 420x360.
Additional Notes:
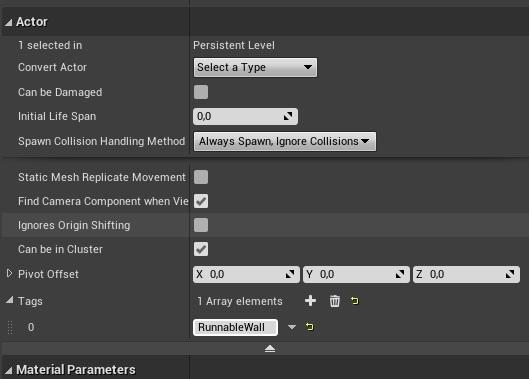
- To make walls runnable you need to go into the Actors section of the Mesh and add "RunnableWall" as an actor tag.
- There is a premade door blueprint in the SDK that you can use in your projects. More prefabs will be available in the future.
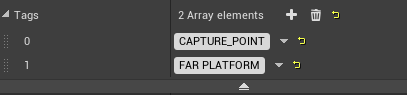
- To add a capture point for the control mode, place an empty actor object in the game and add two actor tags:
0 is always "CAPTURE_POINT"
1 is the name of the point
- To make a server version of your map, simply make a copy of your plugin (which will be the server version) and then:
a) Select all your textures in the plugin
b) Right click - Asset Actions -> Bulk edit via property matrix
c) In the "Compression" section - set "Max Texture Size" to 2.
This guide will teach you the basics on how to create custom melee weapons for Vertex. You should read the guide for the basic SDK setup first, if you haven't already. It's assumed that you already created a new plugin.
1) Open the folder MeleeWeaponsModding in MCS/SDK inside the content folder. You will notice that there is a class named "MOD_VertexMeleeWeapon". All melee weapon mods must be derived from this class. There are two ways to create new melee weapons:
a) Right click on that class and create a new "Child Blueprint Class".
b) Open the "WeaponMODTemplates" folder and duplicate whichever template you want to use (don't create a new child in this case).
You can rename your new asset to a new name, for the sake of this guide we will call it "MyFirstWeapon".
2) Drag and drop the asset to your plugin's content folder and select "move".
3) Double click "MyFirstWeapon" and open the asset's blueprint.
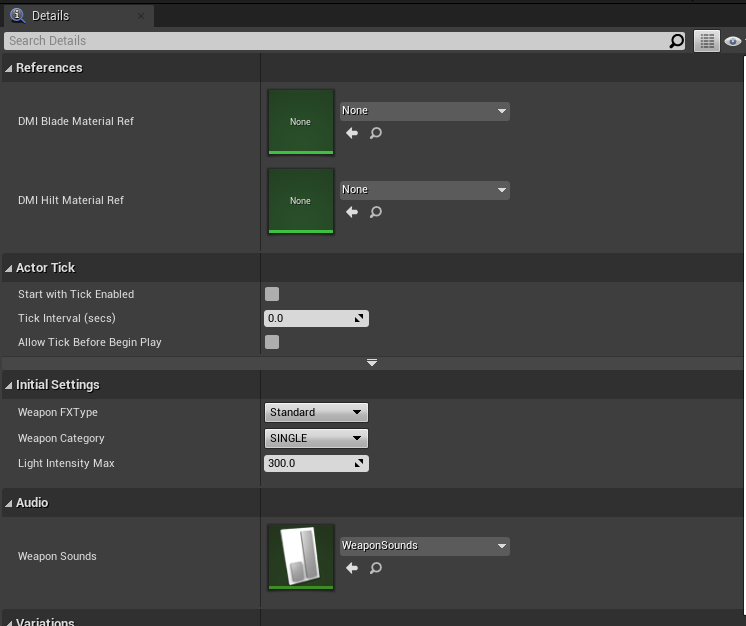
There are three styles of swords: Standard, Plasma and Hybrid. This will affect the particle-effects (for example blood) and the default sound-effects of your sword. You can set this by changing the "Weapon FXType". Standard is meant to have no lighting effects. That does not mean you can't add them yourself though. But, in general, standard is for a weapon which spawns in "as is", like for example a metal sword. The "Weapon Category" sets the weapon-type: Single, Staff or Duals. The light intensity only matters for plasma and hybrid swords.
4) Go back to the SDK, and make a copy of the WeaponSounds data table in the MCS/SDK/ MeleeWeaponsModding folder. You can name that data table anything you want. Move it to your plugins content folder.
5) Open the data table. This table allows you to assign new sounds to your custom weapon. The only thing you need to do is to add the path to your sound file to "RelativePathToSoundFile".
Those paths are always relative to where your pak file is located. It is highly recommended that you use subfolders for your sounds, for example " MyFirstWeapon/sounds/swordswing.wav".
6) Open up your "MyFirstWeapon" blueprint again. At "WeaponSounds" assign your new data table.
7) Now, we assume that you already have made hilt and blade meshes and that these meshes are already textured and have materials.
All you need to do now is select the hilt in the tree on the left and swap out the mesh in the "Static Mesh" section on the "Details" panel. Same for the blade.
You are not just limited to "hilt" and "blade". You can add whatever extra meshes you want to your weapon. If you want those extra parts to have their own functionality though - you will need to add that to this blueprint. You can also use the hilt model for the whole weapon, this is especially useful if the weapon consists of only one model, which is not separated into hilt and blade.
The green and blue preview hilt and blades should be used for scale when you create your models. You can export those as .fbx files and load them into the modelling software of your choice.
8) Open up the construction script of the "MyFirstWeapon" blueprint. This is where you can add any initial settings you want. For example making the blade's emissive material not glow when the weapon is spawned.
9) Open up the Event Graph of the "MyFirstWeapon" blueprint.
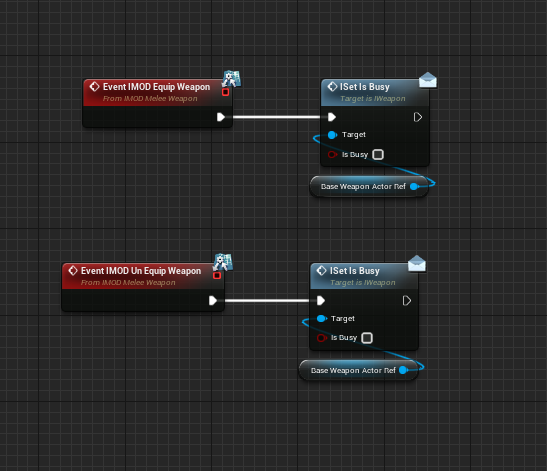
You will notice two interface implementations, for Equip and for Un-Equip. This is what your weapon will do when you toggle it on/off (i.e. combat mode on/off). What this does exactly depends on the template you chose. If you used the hybrid staff template for example, it blends in the emissive to full on equip and blends it out on un-equip. But this is just the default functionality, you can re-implement those functions any way you want.
10) When you equip your weapon in the game, the game sets it to "Busy". This is so if you have a weapon which has an equip "animation" or sequence, you can't spam it. That also means that you MUST set busy to "false". No matter how you use the equip and unequip events, you always need to set busy to "false" using this node.
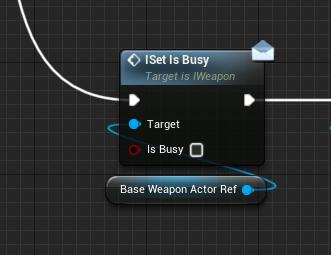
So, lets say you don't have any sequence for equip/un-equip. You could then just do this:
11) Now we create a data table so the game can find your mod.
In your plugin folder, right click->Miscellaneous->Data Table, for the structure select "AttachableItemDefinition".
Your data table must have the following name: "DT_UCC_ITEMS". You can have as many weapon entries in this table as you want.
So, start filling it out:
- Type = MeleeWeapon
- SubType = Sword/Staff (depending on your type of sword).
- UseableByFaction = Melee
- IsExternalModification = TRUE
- IsRequiredCategory = TRUE
- AttachableClass = Actor
- ActorClassRef = (select your weapon class)
- UI_ItemCategory = WEAPONS
- UI_ItemSubCategory = Should be something like "SWORD" or "HYBRID SWORD".
- UI_ThumbImage is what you see in the customizer. Just import your thumbnail image by drag and dropping it into your plugin's content folder. The dimensions of the image are 70 X 96, but it can be any size as long as it has the same aspect ratio.
- The "item name" is the name of the weapon and the "tool tip" the description. This is what you see as the label and tooltip in the customizer.